
Day 4 of healthy Halloween candy recipe week. So far we’ve look at alternative real food recipes for a Crunch Bar, Almond Joy and a Reese’s Peanut Butter Cup.
Today, we’re going to tackle the Butterfinger!
Let me tell you, this was hands down my favorite. It tastes EXACTLY like the real thing.
Like with all these candies we’ve looked at so far, they should all contain just a few, real food ingredients: chocolate, the respective filling, and a sweetener. Yet we’ve found so far that most contain 14-30+ ingredients, mostly all that are food-like product ingredients not ideal for your most optimal health and vitality.
The Butterfinger is no exception.
I wasn’t able to find ingredient facts on the Butterfinger website like the other candies we’ve looked at so far, but I did find it here from a Wiki source. According to that source, the Butterfinger contains processed sugar, glucose (sugar…anything ending in -ose is sugar), hydrogenated oils, genetically modified organisms (GMO), soy-based ingredients, corn starch & corn flakes, artificial flavors, preservatives and other chemicals.
Do you want that junk in your body?


These homemade healthier butterfingers are 100% real food ingredients, vegan-friendly, gluten free, dairy free and paleo (if you’re not strict on peanut butter/legumes). Let’s take a look…
Chocolate Ingredients:
1/2 cup melted cacao butter
1/4 cup melted coconut oil
3/4 cup cacao powder
2 tablespoons maple butter
1 tablespoon coconut milk
1/2 teaspoon vanilla
1/8 teaspoon pink salt
Filling Ingredients:
1 cup peanut butter
3/4 cup maple butter
Note to strict Paleos: I tried to recreate this with cashew butter and almond butter. It worked for a hybrid candy, sort of, but it wasn’t a Butterfinger. This recipe needs peanut butter.
Equipment:
Kitchen thermometer – I use one like this
You can use an actual candy thermometer too

Directions:
1. Add your maple butter to a sauce pan on medium-high heat.
2. Here’s the semi-tricky part: it’s going to start to bubble and this is where you need your kitchen thermometer. As it’s bubbling, monitor it with your kitchen thermometer until it gets to 275 degrees. You don’t want it to bubble over either. If it starts to get close to the top of your sauce pan, pull off the heat for a few seconds until the bubbles reduce back down.
3. Once it reaches the 275-280 degrees, pour it into a bowl with your peanut butter and start to stir it all together quickly so it all gets incorporated. You’ll notice the mixture will start to get that stringy, Butterfinger center-like texture to it.
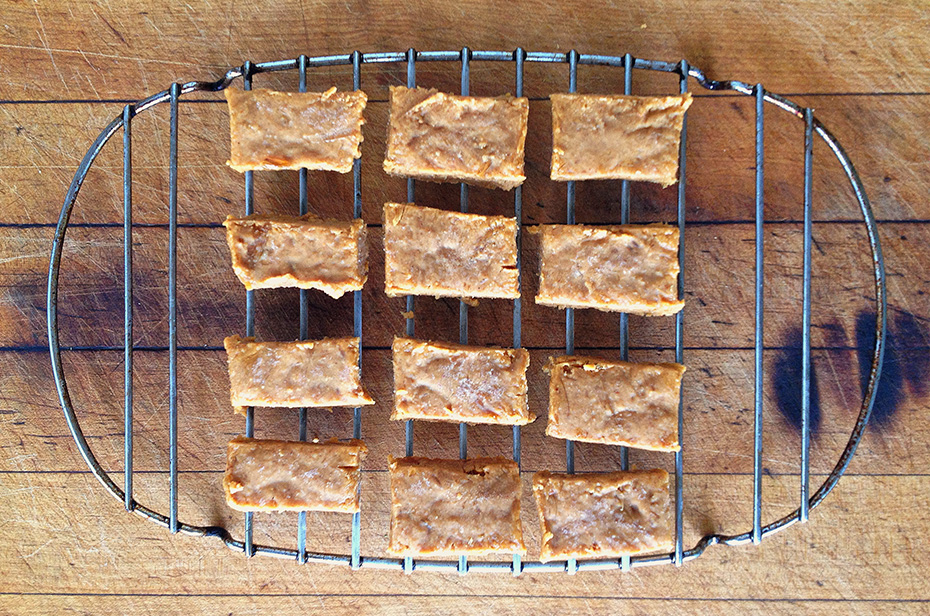
4. After it’s all mixed in together, add the mixture to a lightly oiled baking dish or pan (I used a bit of melted coconut oil and wiped it around with a paper towel until it was coated). As for pan itself, see picture above. I used an 8 x 4 inch bread pan…you basically want something that will yield the size/height of candy you’re going for.
5. Spread/mold the mixture evenly and place in freezer to set.
6. You can do your chocolate sauce while the filling mixture is setting.
Start by melting your cacao butter and coconut oil in a sauce pan.
When doing this only melt it on lowest heat. I even recommend having the sauce pan barely on the burner, as well as taking it off the burner and letting it slowly melt as the pan heats up. We want to keep the nutrient contents intact as much as possible and raw cacao butter begins to melt between 95-100 degrees (that’s why chocolate melts in our mouth).
After your cacao butter and coconut oil is melted, add all your other ingredients off of the heat and whisk together until all incorporated.

6. Once mixture has set, remove from pan/dish and cut into the size pieces you want (above)
7. Add your pieces to a rack with something under it to catch dripping chocolate sauce (I just used a random 8 x 8 kitchen pan). See two pictures below.
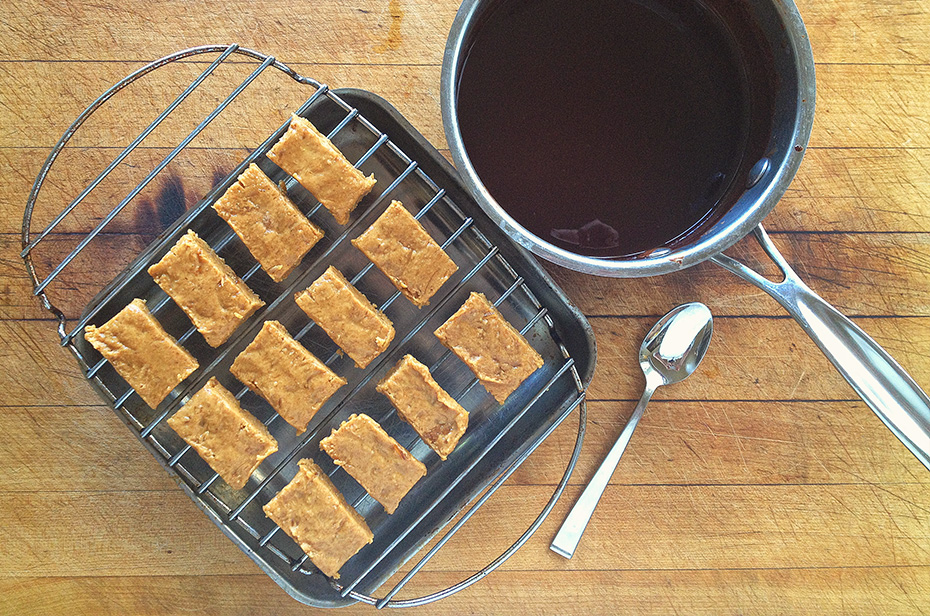
Now it’s time to add your chocolate sauce to your Butterfinger centers.
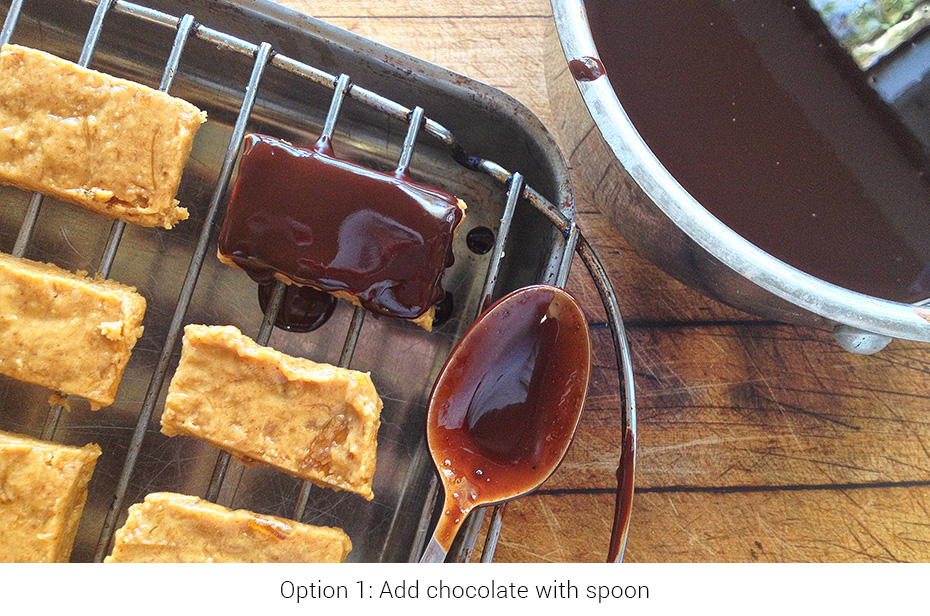 8. You have one of two options for adding the chocolate sauce. You can either spoon your chocolate sauce over each piece (above picture), or you can dip each piece in the chocolate sauce with something like kitchen tongs (below picture).
I found dipping a little easier and quicker to do.

9. Once each piece is dipped, add your rack/pan to the freezer and let them set for about 30-45 minutes.
That’s it. I kept mine stored in the freezer and they were fine to me to eat cold. If you want, you can pull one out and let it sit for 5 minutes or so.
Out of all the healthy alternative candies this week, this was my favorite. They were hard to put down! Tasted identical to the real thing and these were done with 100% real food ingredients instead of the chemicals, preservatives and poorly sourced ingredients we all know in the commercial Butterfinger candy bar.
Now that being said, remember just because these are healthier alternatives… it still is candy. So as always, my recommendation is to enjoy in moderation and stick to your metabolic type ratios and an 80/20 lifestyle for your most optimal health. Personally, I enjoyed one to sample but I keep candies like this to Reward Day, which for me is Friday evening to Saturday evening.
Enjoy!
Yesssss please!
ha glad you like Heather 🙂
I’m going to be making these and the almond joys this weekend! I’m just awaiting the maple butter I ordered 🙂
Great Vanessa, let me know how they turn out
My son likes butteefingers and I would much prefer he eats this! It would be a fun project to do. Can one make mapple butter at home? Or is it something that must be bought? Maple butter is not an ingredient I ever used so I am not familiar with this…
Thanks
Ana
I’ve never made it at home Ana, only bought it. It can sometimes be hard to find local, like a Whole Foods is hit & miss… but you can order on Amazon.com.. I link all of the ingredients I use (see ingredient list) so everyone not only knows what I’m using, but the brands that I personally use and approve of as well (food industry can be very deceptive!)
oh! and let me know if you make them.. would love to hear what your son thinks about them 🙂
I plan on surprising my boyfriend with these. Can’t wait to try out the recipe and get his feedback! 🙂
Awesome, let me know how they turn out. These were one of my favorite from all the Halloween candy remixes. You picked a good one!
I made these today but with some substitutions and they are amazing! and my kids love them. I decided I would give this recipe a try even though I didn’t have all of the ingredients. I used a combination of honey and maple syrup when I was making the filling, instead of the maple butter. I added some organic shredded coconut because I figured it would make the filling taste like chic-o-sticks (and it did!) For the chocolate coating, I used maple syrup to sweeten it and almond milk instead of coconut milk (because I didn’t have any and didn’t want to run to the store) I am so happy I found your site and this recipe. This is such a great way to satisfy a sweet tooth. I will definitely try the almond joy next week. I’ll make sure to grab the maple butter at whole foods.
Awesome Marlene! and very cool with the adaptations and it working out! I always like to encourage getting creative in the kitchen 🙂
btw.. the almond joy was one of my favs! Let me know how it turns out for you